Non-Destructive Inspection (NDI) Advanced Through Thermography Innovations
NCMS Technology Briefs highlight NCMS’s cultivation and growth of innovative technologies. Through our management of government and industry collaborations, we’ve gained insights into novel approaches and best practices that can assist all companies to navigate the sometimes complex journey toward advancement. Based on the results of NCMS technology projects, the briefs show the applicability and usefulness of proven technical advances—all in an effort to speed adoption and eliminate duplication of effort. NCMS is pleased to share these insights to support U.S. manufacturing competitiveness.
The Large Standoff/Large Area Thermography (LASLAT) Tool
Since the discovery of infrared light in 1800, technological advancements in thermography have facilitated the development of increasingly sophisticated thermal imaging (also called infrared) cameras. Invented in 1929 and brought to market for industrial and commercial use in 1965, these cameras detect infrared energy—which is invisible to the naked eye—and convert it into an electronic image that technicians use to calculate variations in temperature. Over the past two decades, thermography has become a widely accepted method for non-destructive inspection (NDI). Today’s high-resolution infrared cameras, which enable real-time digital transfer to computers, are used in many industries, including medical diagnostics, aerospace, construction, manufacturing, power generation, automotive, and electronics. In the military, they are increasingly used for condition-based and predictive maintenance on high-value assets.
The benefits of thermography continue to expand, particularly as technological advancements have enabled infrared cameras to capture ever-larger objects.
Thermal imaging can be used on several materials: metal, composites, electronics, wood, plastics, paint, packaging, leather, and food. When applied to objects made of these materials, thermography detects externally invisible problems such as corrosion, cracks, blowholes, bubbles, adhesive defects, and delamination. Inspectors use thermography for several purposes: determining layer thicknesses in composite materials; detecting foreign bodies; maintaining critical components such as rotor blades on aircraft or wind power plants; inspecting weld seams, welding spots, and joints; and checking for leaks.
Thermographic inspection uses either a component’s inherit heat flow (passive thermography) or an induced heat flow (active thermography) to detect component abnormalities. Passive thermography is used to inspect objects from large distances, while flash thermography (a technique of active thermography) has primarily been limited to close-proximity distances. However, it is possible to leverage the past success of close-proximity flash thermography and the large distance-to-target principle of passive thermography. This is the technique that the National Center for Manufacturing Sciences (NCMS) has helped to advance.
Technological Advancements in NDI
Because inspections are a significant factor in driving sustainment costs, NDI innovations benefit DOD maintenance. As the DOD maintains high-value assets such as aircraft, technicians must have the ability to detect the earliest indications of defects before the structural integrity of the aircraft is compromised, so they can perform repairs or replacements. For older aluminum aircraft, NDI could be performed by examining specific locations—lap seams, fasteners, and joints—either visually or audibly, using a coin tap. However, the use of composite materials in modern military aircraft poses a challenge for these NDI methods. Severe defects with potentially catastrophic implications—ballistic impact damage, fluid ingress, delamination, adhesive disbonding, and repair issues—may not be visually detectable at the surface.
Before early twenty-first century advancements in thermography, technicians performed NDI on aircraft with ultrasound (UT). However, using UT for large areas was time- and labor-in-tensive because it required that technicians either manually move the detector over the aircraft surface, or integrate the detector into a fixed gantry scanning system or immersion tank. Fortunately, technological improvements in thermography have provided a superior alternative to ultrasound. The DOD began using thermography at NAVAIR in 1998, and it has since been used by fleet readiness centers (FRCs), the Air Force, Army, Coast Guard, and prime contractors. NDI innovations in thermography enable inspectors to cover a larger surface area, decrease inspection time, and detect a full range of possible defects.
In 2001, NCMS’s industry partner Thermal Wave Imaging (TWI) developed a method called thermographic signal reconstruction (TSR) that facilitates an unprecedented degree of sensitivity, depth range, and resolution of subsurface defects. In addition, TSR precisely measures thickness, defect depth, and thermal diffusivity in a wide range of composites, metals, polymers, ceramics, and other advanced materials.
NCMS’s Collaboration: Advancing Thermographic NDI
When the DOD wanted to be able to perform NDI on helicopter rotor blades by scanning them from a distance, NCMS responded by establishing a demonstration project to test the capabilities of an advanced inspection system: large standoff/large area thermography (LASLAT). Through a 2017-2018 partnership between TWI and the Air Force, this advanced NDI technology, which uses thermography to inspect large areas of composite aircraft, was successfully demonstrated to have the capabilities the DOD requires. A key advantage of the LASLAT system is its portability: technicians can move the system directly to the aircraft, instead of needing to take the aircraft to another location.
The LASLAT technology allows a single mobile system to be used for inspections on multiple platforms without the need for a fixed gantry. Automated inspection routines eliminate manual positioning, providing repeatable inspections. The system can cover an inspection area of 17 feet by 15 feet, at the rate of 7 ft² per minute. Operating from a distance of up to 12 feet, this technology uses a novel thermal projector to thermally excite an inspection zone on the air-craft surface.
Then, the system scans the entire inspection area, providing an aggregate subsurface map that is easily interpreted by the operator. Technicians use an infrared camera to monitor the resulting surface temperature change and use a modified version of TWI’s TSR method to detect subsurface defects or anomalies including delamination, disbonding, fluid intrusion, impact damage, and other defects. Next, by using data analysis tools in a software program called MOSAIQ®, technicians pinpoint the exact location and measurements of defects, while maintaining the perspective of a large inspection area. This software rapidly processes separate scans into larger images that can be sent by cell phones and other Wi-Fi-enabled devices.
Benefits of LASLAT as an NDI Method
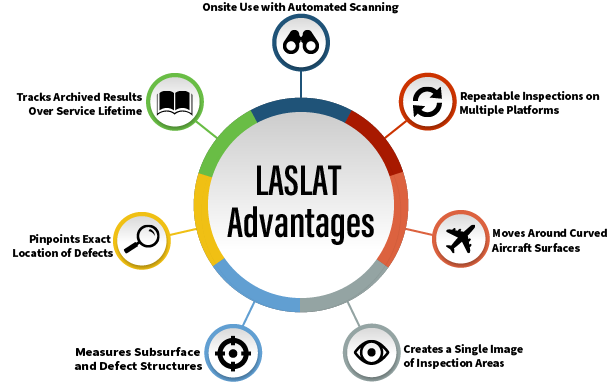
The NCMS project demonstrated LASLAT on the Northrop Grumman RQ-4 Global Hawk, a remotely piloted surveillance aircraft. The team used the system to perform multiple inspections, including portions of the fuselage, wing, and v-tail structures. When compared to other NDI methods, the LASLAT technology offers the following advantages:
- Compact nature allows onsite use for fully automated scanning
- Repeatable inspections on multiple platforms, both on- and off- aircraft
- Moves around curved aircraft surfaces
- Software creates a single image of the inspection area for detection and measurement of subsurface anomalies
- Data analysis tools provide measurements of subsurface and defect structure
- Intelligent defect identification tool pinpoints the exact location of defects
- Tracks archived results over service lifetime
Through the NCMS project, the DOD has found additional benefits in the LASLAT technology:
- Before this technology existed, it took roughly 10-14 hours to scan one blade. With LASLAT, it takes 3-4 hours
- 70% reduction of inspection times for the NAVAIR FRC-E V-22 prop rotor blade, saving an average of 625 labor hours annually
- Increased documentation/traceability of blade inspection, improving the structural integrity of aircraft
For a deeper dive into the LASLAT technology, a 2020 article in The Society for the Advancement of Material and Process Engineering (SAMPE) Journal compared the flaw detection performance of the system with that of a conventional flash thermography system.
Further Applications of LASLAT for NDI inspection
This technology has enhanced the readiness of military aircraft by minimizing maintenance times and detecting defects that compromise the structural integrity of critical components early, reducing the likelihood of unexpected failure. Planned future inspections for this system include H-53-K blade inspections, H-1 upgrade inspections, and F-35/V-22 fuselage. This technology has also shown promise in scanning airframes and larger components.
The LASLAT system has many potential applications for the commercial airline industry. It can be used on aerospace composites to find delamination, FOD (foreign object detection), water ingress, thickness measurement, porosity, disbonding, and impact damage. Additionally, it could be applied in other industries, such as power generation, automotive, marine, electronics, sporting goods, and more.
